

I love love love chocolate mousse cake and I wanted to try a chocolate mousse cake for a quite long time and i finally accompolished... The chocolate mousse cake is a dessert for those time when you feel like you have earned a treat, because it is quite a rich piece loaded with chocolate and whipped cream...

Made a two layered rich dark chocolate cake and take a syrup soaked chocolate spongy, top it with a layer of chocolate mousse, garnished with freshly - whipped cream and grated chocolate. Dip your fork into it, And remember the magical moment forever...Even though it take less to make but assembling and setting time is totally upto 7 to 9 hours so start preparing it at least a day...

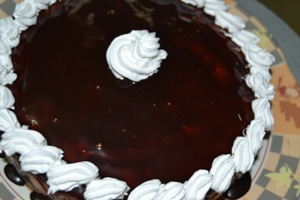
I made this special cake for my kids... This cake was so moist, fudgy, chocolately, creamy and especially the mousse was very chocolatey...Totally yummy and delicious to your lovely kids...The mousse in between the two layer of chocolate cake, Poured some chocolate sauce all over it and topped it with lots of chocolate shavings... Heaven in each and every bite....

The other cake using whipped cream in my blog is...
Similar Recipes,

So try this delightful and delicious cake and comments about the cake...
Preparation time : 1 hours
Baking time : 30 to 35 mins
Chilling time : 3 hours
Makes - 8 slices..
INGREDIENTS :
All purpose flour / Maida - 1 cup
Sugar - 3/4 cup
Egg - 2
Butter - 80 grams
Cocoa powder - 2 tbspn
Baking powder - 1 tspn
Caramel essence - 1 tspn
Vanilla essence - 1 tspn
Pineapple essence - 1 tspn
FOR DECORATING :
Chocolate mousse - as needed
Chocolate syrup - 1 cup
Sugar syrup - 1 cup
Chocolate curls - 1 cup
METHOD :
- Preheat oven for 200 degree C.
- First prepare the cake by applying butter on the bottom of the baking tin and sides..
- Dusting some flour on the tin and remove the excess.
- In a mixing add eggs and sugar beat well till sugar dissolves..
- Then add in butter and beat till they fluffy and smooth...
- Add in baking powder, flour, cocoa powder and beat till creamy consistency.. Now add in vanilla and pineapple essence and mix well..
- Now add in caramel essence and Fold gently then the colour will be change into dark brown...
- Now the batter is ready to bake..
- Pour this into the prepared tin and bake it for 35 - 40 mins untill it is light golden brown and a toothpick inserted comes out clean.
- Let it cool in the tin for 10 mins.
- Now invert the cake from the tin and set aside to cool down..
HOW TO DECORATE THE CAKE :
- When the cake is cooling, make the chocolate mousse...
- Now slice the cake into two half and take one half, place it on the cake board..
- Now brush it with some sugar syrup, and spread the mousse over it.
- Place another cake over it and brush it with some syrup and spread the mousse all over the cake.
- Chill in the fridge for 15 mins. Now take your chocolate syrup and pour it over the cake...
- Decorate with some whipped cream and Top the cake with chocolate curls...
- Chill the cake overnight and serve...
PICTORIAL :

Take your ingredients

Break the eggs in a bowl

Add in sugar

Beat till sugar dissolved

Beat till creamy

Add butter and whip till fluffy and smooth

Add in baking powder

Add flour

Some cocoa powder

Beat till fluffy

Add some vanilla and pineapple essence

Remove the beater

Mix with spatula

Prepare your tin

Pour the batter in to the pan

Bake it

Let the cake to be cool

Slice the cake

Place the cake in the cake board

Brush some sugar syrup

Take a spoon of chocolate mousse

Spread it evenly

Place another slice cake

Brush it with some syrup

Take a spoon of chocolate mousse

Spread it evenly

Sides too

Place it on the plate

Take chocolate syrup

Pour it over the cake be generous
Decorate with some whipped cream

Prepare your chocolate curls

Topped the whole cake with it

Now chill the cake for a while

It's done

Sliced it and serve
Enjoy....
Wowwwwwww looks so yummy... your pictures triggering us to try at home.
ReplyDeleteThanks for ur feedback and keep commending on my blog to encourage me...Ramjeemathy
DeleteWowwwwwww looks so yummy... your pictures triggering us to try at home.
ReplyDeleteHi Vani, When is the butter added? Where do u use the butter?
ReplyDeleteSorry to mensioned, now iam changed and mension the butter..
DeleteThanks 😊
Delete